Showing posts with label DIY. Show all posts

Friday, June 5, 2015

DIY Donut Day Tote Bag


Today is National Donut Day, and in honor of this glorious day I decided a donut tote bag was in order.  And in true Laurendy Home fashion, this diy is super simple.

Supplies:
  • 1 sheet of ink-jet printable iron-on transfer paper
  • donut graphic download (get it here)
  • plain canvas tote bag 
  • iron


Now just follow directions for the iron-on transfer paper to print out the graphic on the transfer paper and then iron it onto the tote bag. . . Seriously, that's it.


Now rock that donut tote and go enjoy some actual donuts!

Friday, May 29, 2015

DIY: Wooden Bubble Gum Ball Necklace

Everyone and their brother has done a painted wooden bead necklace diy (seriously, I have an entire Pinterest board of them). So I figured it was my turn.


I wanted to make one that my nieces (ages 5, 4, & 3) would be totally into, hence the Wooden Bubble Gum Ball Necklace was born.


Supplies:
3 large bubble gum ball sized wooden beads
1 smaller wooden bead
3 bottles of nail polish in bubble gum ball colors
2mm leather cord (or any beading cord if you want if you aren't into leather)
scissors


Start by painting each of the 3 large beads with a different color of nail polish.  I used nail polish because it gives the beads that nice shiny bubble gum ball look.  I choice to leave the smaller bead unpainted, but you can paint it if you want to.


Tip: sit the beads down on a piece of scrap paper (with the hole facing up) and then paint the top half the bead, let dry and then flip over and then paint the other side.  Let the painted bead dry over night.

Next it is time to cut the cord and string the beads.  Decide how long you want your necklace (making sure it can slip over your head) and then add 8 inches.


String on the 3 large painted beads.  Knot the cord, leaving a tail that is at least 4 inches.


Slip the smaller bead onto the tail cord until it is up against the knot.  Secure the bead by adding another knot.  Then trim what is left of the tail to a length you like.


And now you have yourself a Wooden Bubble Gum Ball Necklace.


Wear and enjoy!

Friday, March 14, 2014

DIY: St. Patty's Day Ombre Paper Chain Garland

 
I realized that St. Patty's Day was only a few days away and I totally didn't have any decorations up!
The 1/4 Irish part of me was not happy, so I through together a quick little garland to remedy the problem. 
 
I've been wanting to make an ombre paper chain for a while and it turned out to be one of the easiest crafts I've ever made.
 
 
All you need is at least 3 pieces of cardstock in 3 shades of the same color*, a pair of scissors and a stapler.
 
*Craft stores generally make this very simple by organizing all their scrapbook paper in gradating color, so just choose 3 or 4 colors in a row.
 
Okay, so now you just cut the cardstock into strips that are roughly 1 by 6 inches and then make a paper chain, starting with the darkest color first and the lightest color last. . . and there you go, an ombre paper chain garland!
 
 
Now hang that puppy up and drink some green beer (or not).


Tuesday, February 4, 2014

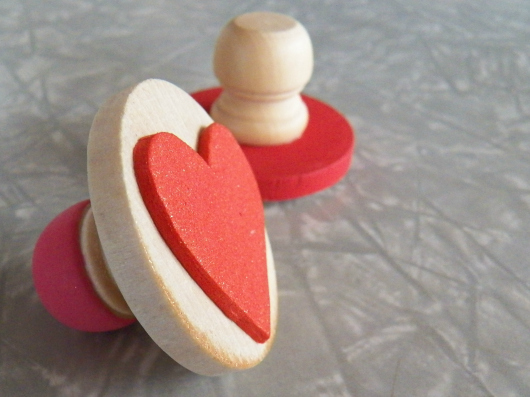
DIY Wooden Handled Heart Stamps

 
Valentine's Day isn't my favorite holiday, but I am a fan of the heart shape. . . So I whipped a craft that can either be for Valentine's Day or those who just like a good heart - a cute little wooden handled heart stamp -
 
 
What you need:
  • 2 inch wooden disks
  • wooden dowel ends
  • a sheet of craft foam
  • scissors
  • wood glue
  • white glue (or sticker maker)
  • red and/or pink paint
  • paint brush
  • stamp pad
  • blank note cards
(everything was picked up at my local craft store)

 
First step in making your heart stamps is painting what will be your handle.  You can paint the disk, you can paint dowel ends, you can paint them both, or you can choose not to paint any of it and you can totally skip this skip. Paint the disks on the top and around the sides, leave the bottom unpainted. Paint wooden dowel ends, I choose only to paint the tips and left the rest unpainted - I liked the look of the wood.  All the painted pieces needed two coats of paint for even coverage.


Once the paint has dried it is time to attach the two pieces of your handle - a little dap of wood glue will do you. While your glue is drying we can cut what will end being the stamp part of your stamp. This part is super easy, using your scissors just freehand cut hearts out of your craft foam. Just make sure your hearts are smaller than your wooden disks.

 
Next it is time to attach your stamp to it's handle, you can use your finger to add a smooth thin layer of white glue to the back of your craft foam heart (or you can run it through a sticker make) and then attach it to the bottom of the handle. . .

 
Now get to stamping! 

 
Note: don't skimp on super cheap ink, it does make a difference (see above)

Monday, October 14, 2013

DIY: Fox Mask on a Stick


With Halloween looming I decided I need a quick costume option for last minute outings and work. . . hence Felicity Fox (though you could use the mask and just be a fox, fox - no literary reference needed).

What you need:
  • a wooden cat mask on a stick (I picked mine up for $1 at A.C.Moore)
  • 3 sheets of craft felt - 1 off white, 1 orange, 1 black
  • glue
  • scissors
  • black and white paint 
 
 
I started by priming the mask with the white paint, then I painted the stick, back and edges black.
 
Next I traced the shape of the mask onto a piece of paper and then cut the paper free hand to make a fox template (see above).
 
Then I traced the template pieces onto the felt and cut them out as well.
 
Finally I glue the felt pieces to the mask, let it dry and them WHAMO, I have a fox mask on a stick.

 
Pair the mask with a yellow patterned dress and you have Felicity Fox, pair it was a suit and you have Mr. Fox. . . pair it with anything else you have a well dressed fox.

Monday, August 26, 2013

Repurpose DIY: Mini Geometric Planters

 
I spotted these little bitty dip bowls at Target (sorry, can't find them on their site) and thought to myself these are way too awesome to be filled with bean dip. Then I realize they would make excellent mini planters.
 
 
It also didn't hurt that they were also super cheap (two for a dollar) so I bought a ton of them and brought them home with me.

all you need:
some cute little plastic bowls
a drill
a few mini plants
a little soil

 
You want to flip your little bowl over and find the center. Luckily for me these little oddly shaped bowls had a little divot that I used as my center point.  Now very carefully drill* yourself a drainage hole.
 
*every time you use a power tool make you follow all of it's safety guidelines and proceed with caution.

 
Now you have a bunch of dip bowls with holes in them! (I know it's hard to tell from the photo, but there are holes)

 
Next flip your bowl back over and get planting!


 BAM! You now have yourself a little mini geometric planter!


Now, just repeat until you fill up your windowsill.


Tuesday, August 6, 2013

DIY: Coin Statement Ring

 
I was wandering around the sewing section of my local craft store when I spotted some pretty tacky replica coin buttons, and I thought to myself "wow, those are some tacky buttons, but they would make awesome rings". . . and so, another super simple DIY was born.
 
Supplies (all can be picked up at your local craft store):
 tacky shank backed replica coin buttons, assorted ring blanks, E6000 glue, pliers

 
First you want to pair up your ring blanks with your buttons, I tried to match the finishes up as closely as possible.
 
Next you want to remove the buttons shank. I used a pair of pliers and just pinched it them off on the plastic ones, on the metal ones I used the pliers to wiggle the shank back and forth until it fell off.*

 
Once you have the shanks removed, go ahead and use a little E6000 and glue the ring blanks in place.
 
Then you just have to wait for them to dry (I suggest overnight).

 
BAM! Now you have yourself a pretty rad coin statement ring!


*You want to be careful and choose buttons with shanks that are simple to remove - one of the buttons I bought ended up with a super thick metal shank that I had to have a professorial remove with a grinder. . . which is way too much work for what is suppose to be a quick and simple craft.

Thursday, May 30, 2013

DIY: Honeycomb Cupcake

 
I have been inspired by all the cute honeycomb crafts that Studio DIY has been making, so I decided to give it a go and make myself a honeycomb cupcake. . . and you can too.

Friday, March 15, 2013

Lucky Craft Round-up


Last Minute St. Patrick's Day DIY

 
What happens when you have little painted wood cut-outs left over from a St. Patrick's Day craft and tons of pin backs left over from a Valentine's project?

 
You add a little hot glue, that's what you do. . .

 
And you make yourself some super cute little St. Patty's Day pins (yes, this coming from the girl who begged you not to dress like a leprechaun on March 17th).

Tuesday, March 12, 2013

DIY A Leprechaun Box


Making leprechaun box is a fun simple DIY you can do with a little one (as in child, not leprechaun).

What is a leprechaun box? A leprechaun box is a green decorated wooden box that a child leaves out the night before St. Patrick's Day in hours that a leprechaun will stop by in the middle of the night fill it with goodies and then hide it somewhere in you home. It is something my mother did with my sister and I while we were little (I'm pretty sure she got the idea out of an early 90s parenting magazine).

Supplies


The Box: a wooden shaker box, green paint, paint brush, glue, things to decorate the box: stickers, glitter, sequins, wood cutouts, pompoms (use what you have on hand)

Other stuff: goodies to full the box, gold sequins or confetti, a super shiny penny

Now that you've gathered the supplies it's time to put together your leprechaun box -

 
Step 1 - Paint the box green - with younger kids (or impatient kids) you may want to do this step ahead of time. I used two coats of a nice kelly green and even with those two coats it was dry enough to decorate within 20s or so.
 
 
Step 2 - Time to decorate! This is the fun part, give the kids a pile of  whatever craft supplies you have on hand and let them go at it.  Of course if there is a glue gun involved make sure that an adult does the actual handling of the glue gun.  Again, depending on the age of the kids you may have to be a bit more hands on (Lily didn't write her own name in gold glitter paint)
 
Once everything is dry you have yourself a leprechaun box. . .
 
 
Now what to do with it -
 
The night before St. Patricks Day you have your little one (again - child, not leprechaun) leave the box out before they go to bed, with the box they should leave the shiniest penny they can find.  Leprechauns are attracted to shiny money.
 
Once the little one is tucked in, it is time for the leprechaun to get to work.  Take the penny and fill the box with little treats.  I picked up a bunch of small green candies and prizes from the party store (don't go crazy, you have to do this again next year).
 
 
Then you hide the box somewhere in the house, not anywhere too hard to find.  Lastly you leave a leprechaun trail of gold from where the box was to where it is hidden. Cause, leprechauns always leave golden trails, duh.
 
When the little one wakes up in the morning and goes to check on their box they can follow the trail to where the leprechaun hid it and find their prizes.
 
I remember the first time my sister saw the leprechaun trail, she looked at my mom in complete shock,  yelled "IT WORKED!" and then off she was to find her box.

Tuesday, February 12, 2013

DIY: Last Minute Valentine Brooches

 
I'm not big on Valentine's Day, but this year I decided to embrace the heart.  So I made a bunch of simple heart shaped brooches to wear and give out on the 14th - and you can make some too!


Supplies:
  • scissors
  • colored phone crashed sheets and pink and red
  • a fine tip tip marker
  • pin backs
  • loaded hot glue gun
  • optional - glitter, glue (or glitter glue) paint, metallic marker, sequins, whatever you have on hand

1. Use your Sharpie to freehand draw hearts on your craft foam, aim to make them around 2 inches square (much smaller and they'll be hard to cut out much, bigger and you run out of craft foam to quickly)

2. Use your scissors to carefully cut out your hearts, then decide on a front and a back

3. Now it's time for the fun part - decorating!  Use your glitter glue and what not and go to town on those bad boys (or you can just leave them blank), if your real crazy you can go ahead and glue two of the hearts together overlapping.

4. When you're happy with your little hearts use your hot glue gun to attach the pin backs.

Now you've got yourself a bunch of little heart pins to give out to all your Valentines, give them out as they are or packaging them up for the Cupid's big day