Showing posts with label Yummy In The Tummy. Show all posts

Wednesday, March 5, 2014

Personal Challenge: A Healthier Pasta Option

I have given myself a personal challenge to eat healthy (or at least healthier) for 2 weeks.  So that means actually cooking. There is one little problem. . .

 I love me some pasta and as a good old (half) Italian girl, 80% of the dinners I make at home include some sort of pasta. 

So I set forth to make a healthy pasta option for myself.

 
I through together this pasta dish one night, and you know what? It was pretty yummy, and besides that, it was simple to make!

What you need:
  • whole wheat pasta
  • fat-free mozzarella cheese
  • 4 baby portabella mushrooms
  • 6 or 7 baby carrots
  • 1/4 cup soy crumbles
  • small can of tomato sauce

All you have to do is brown, add & stir. . .

 
  • Cook a single serving of whole wheat pasta according to package directions and set aside.
  • Time to make the sauce: Microwave your baby carrots for about a minute, then along with the mushrooms, give them a good chop.  
  • Add the carrots, mushrooms and soy crumbles to a pan and brown.
  • Once everything is nice and cooked through add the small can of tomato sauce (if you want things a little thicker, you don't have to use the whole can)
  • Stir in the whole wheat pasta and mix it all up.
  • Serve with a sprinkling of the fat-free cheese. . .
There you go, a healthier pasta option. 
 
(Oh, and sorry for the crappy cell phone photos)

Tuesday, July 2, 2013

Red, White, & Blue Berries & Cream Bites

With July 4th quickly approaching I was looking for a bit sized dessert that was light, refreshing, and, of course, super simple to make.
 
 
This is what I came up with - Red, White, & Blue Berries & Cream Bites!
 
 
What you need -
  • vanilla pudding
  • whipped cream
  • blue berries
  • strawberries
  • phyllo shells
tools: a cooking sheet, a mixing bowl, a large spoon, a small spoon, a cutting board & a kitchen knife
 
Note: You can use any recipe you want for the pudding and whipped cream (or you can buy them pre-made, I won't judge you for it). When it comes to the berries you can experiment, I choose strawberries & blue berries for their patriotic flair (and because I had blue berries on hand from a failed recipe attempt).  The phyllo shells can be found in most super markets' freezer section.

 
Lets get started!
 
In a mixing bowl fold together equal parts vanilla pudding and whipped cream (go ahead and taste it, it's super yummy). 
 
Wash your berries and slice up you strawberries, you want the slices to be on the thicker size so that they stand up to the fluffy goodness that is the cream mixture.
 
Crisp up your phyllo shells according to package directions (you can use them straight out the box if you are pressed for time).

 
Using a small spoon, carefully fill the phyllo shells with the cream mixture. The phyllo shells can be pretty delicate.
 
Carefully place a slice of strawberry on one side of your cream filled shells, then place a blue berry on the side. Depending on the size of your berries you may be able to fit a few more berries in each bite.
 
 
Last step. . . ENJOY!

- - - - - - - - - - - - - - - - - - - - - - - - - - - - - - - - - - - - - - - - - -
photos taken be Kelly Coulson Photography for Laurendy Home

Tuesday, October 16, 2012

Canning Jar Cheesecakes 2 Ways

 
I needed a dessert for a dinner party, I wanted to make something simple, but I also wanted something that screamed "Martha ain't got nothin' on me". . .
 
Thus, individual cheesecakes in canning jars made two ways.
 
This truly is a super simple dessert to make (super simple is an ongoing theme in my life). 

All you need is a box of Jello No Bake Cheesecake and a box of 4 oz. Ball jars.
 
All you do is follow the directions on the No Bake Cheesecake for individual cheesecakes, but instead of making them in a cupcake tin with cupcake wrappers, you make them in the small canning jars.  It's very easy, but it does take a little while, you want to do it as neatly as possible.

Now it's time to jazz up those plain cheesecakes.

Option 1 -

 
Caramel Pecan Cheesecake - you may have guessed it, simply spoon some caramel sauce on top of the individual cheesecake and then sprinkle with chopped pecans.
 
Option 2 -

 
Strawberry Cheesecake - in a small sauce pan gently heat up some sliced strawberries mixed with a dash of sugar, heat it just enough to make a sort of strawberry syrup. You'll want to cool your strawberries before add them to the cheesecakes.

 
Not only are both options are super simple and super yummy, but they make you look like a dessert rock star (shhh, no one has to know it came out of a box).

Wednesday, October 3, 2012

3 for 1 Dinners: Taco Night

 
Cooking for one really sucks. 
 
You make a great meal one night, you enjoy that meal and then you eat the same thing the next night, and then again the next night and you eat that same meal until you never want to eat it again. . . To avoid the repetitive nature of cooking for one you start to rely on take out more and more until you realize that you don't cook anything anymore.
 
So I decided to start a new series here "3 for 1 Dinners".  Three nights worth of different dinners from one night's meal. First up we have Taco Night.
 

Friday, September 14, 2012

Roast Brussels Sprouts & Bacon

 
I was 30 years old before I ever ate a Brussels sprout.  I was out at a local noodle bar and someone ordered roasted cauliflower & Brussels sprouts for the table.  I figured I would pick at the cauliflower, but I found myself drawn to the Brussels sprouts. . . and I've been hooked ever since.
 
My version of roast Brussels sprouts based on that first taste I had.
 
What you need:
  • Brussels sprouts
  • thick cut bacon
  • salt
  • pepper
  • sesame oil
 
 
  1. gather up your Brussels sprouts, you want 1/4 to a 1/2 lb per person, pull off any icky leaves and chop off the bottom
  2. cut your Brussels sprouts in half lengthwise, if the sprout is extra large it is okay to quarter it 
  3. take your bacon, about 1 piece per person of the thickest cut bacon that you can find (I like Hormel Black Label thick cut bacon) and you want to start to cook it in a skillet.  You don't want to cook it all the way because it will finish cooking with the sprouts in the oven. Chop the semi-cooked bacon into about half inch pieces. Reserve a tablespoon or so of the bacon grease.
  4. mix together your chopped Brussels sprouts, bacon pieces, and reserved bacon grease. Sprinkle mixture with a dash of salt and pepper and splash of sesame oil - a little goes a long way, so use as little or as much as you want (I'm a bit heavy handed because I LOVE me some sesame oil).
Spread your mixture out evenly on a baking sheet and shove into a 300 to 350 degree oven* for 20 to 40 minutes. Check them often and shake them around a few times for even roasting.
 
Sprinkle them with a little salt just before serving and enjoy!


 *I roast my Brussels sprouts at a much lower temperature than most recipes call for because I like them roasted, not toasted.

Thursday, July 26, 2012

Laurendy's Soon To Be Famous Oatmeal Cookies!


I love love love oatmeal cookies, and if I do say so myself, I do make some pretty super yummy oatmeal cookies. I figure there have to be other oatmeal cookie lovers out there so I decided to share my super forgiving recipe.

I'm not one to share my recipes. . . It's not because I want to keep them secret, it's because most of the time when it comes to cooking, I'm just winging it.  So when I actually have a recipe that rocks I am happy to share*.

If you try my recipe please come back and let me know how you liked them.

*No Kelly, I will not give you my tomato sauce recipe. . .

Thursday, May 24, 2012

Get Your Grill On

Grill Time Fun

I grilled my first steak ever this past Monday (I'm normally a burger kind of girl), and let me tell you, I sort of rocked - I am a grill girl for life!

Friday, May 4, 2012

Dinner With Kelly - An Indroduction at The Cheese Course

- My friend Kelly has made it her personal mission to expand my culinary horizons. Her camera in hand (did I mention she is an extremely talented photographer), she drags me across south Florida from one yummy adventure to another! -

The first place Kelly took me to for dinner was The Cheese Course in Mizner Park. The Cheese Course is a local cheese shop / restaurant chain with 6 locations through out south Florida.

Kelly suggested we stay within the sandwich area of the menu (she didn't want to scare me off with a cheese platter my first go around).

Kelly had the Applewood Bacon with Goat Gouda, tomatoes, avocado, rosemary aioli, and greens -


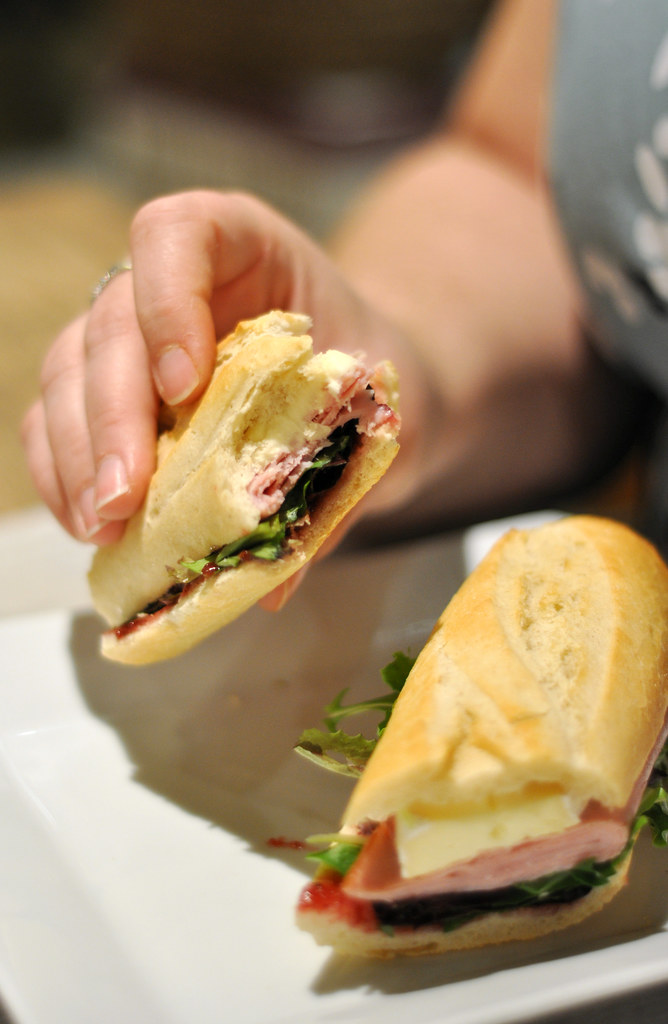
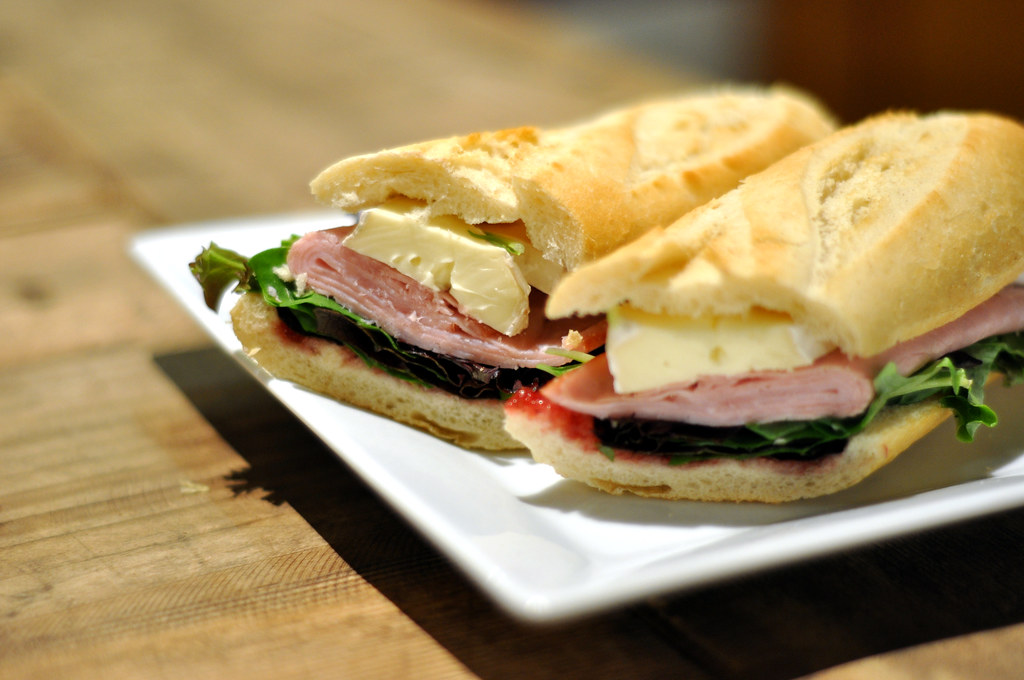
I went with the Black Forest Ham with Brie, raspberry cranberry relish, and greens -


I can't even begin to tell you how super duper yummy that sandwich was! And well priced for that matter.


If you are in south Florida and are near one of The Cheese Course locations, they are totally worth stopping into, even if just for a snack.

All photos are by Kelly Coulson Photography

Dinner with Kelly is a new series here at Laurendy Home which will feature local eateries with a mix of my good friend Kelly's photography & my shamefully sheltered palate and the occasional guest post from Kelly herself.

Monday, November 29, 2010

I Made A Pie

a sweet potato pie. . . from scratch! Besides from making the crust (which I ended up having to do twice) this pie was super easy to make.

2 cups mashed sweet potato
1/2 cup of sugar (I think)
3 eggs
pinch of salt
1/2 a teaspoon each of nutmeg, allspice, and cinnamon
1 cup of sour cream

mix together, pour into an unbaked pie crust, heat the oven to 375, and bake for like 40 minutes (or if your oven sucks like mine does, it's closer to an hour)

It's super yummy - and because it's not super duper sweet or heavy it can be eaten with dinner.

Friday, November 12, 2010

Holiday Feasting - My Go-To Sweet Appetizer

The holiday season is upon us. And along with those holidays come the holiday parties, dinners, and open houses. And along with those holiday parties, dinners, and open houses come the "oh, just bring an appetizer "requests(because, of course, you just had to offer to bring something). . . And for those times I have a few super easy appetizer recipes up my sleeve.

This appetizer is the easiest of them all, the dip itself has just two ingredients, seriously just two -

Fluffy Fruit Dip

A friend in college introduced me to this super easy to make dip (you know it has to be easy to make if you can make it in a dorm room) and I've been using it to wow ever since

All you need:

  • a standard sized tub of cream cheese (I like to get the whipped kind because it makes it easier to mix)
  • a jar of marshmallow fluff (any brand will do you)
  • some cut up fruit for dipping

Okay, so here was you do. . . you mix the cream cheese and marshmallow fluff together until smooth and then. . . well, and then you eat, cause it's really that simple. . . oh, and to make it even easier I buy my apples all ready cut.


Wednesday, November 10, 2010

Holiday Feasting - My Go-To Retro Appetizer

The holiday season is upon us. And along with those holidays come the holiday parties, dinners, and open houses. And along with those holiday parties, dinners, and open houses come the "oh, just bring an appetizer "requests(because, of course, you just had to offer to bring something). . . And for those times I have a few super easy appetizer recipes up my sleeve.

There is a chance that I may have posted this recipe here before, but it's a good one so here we go. . .

Super Simple Artichoke Dip

My mother has been making this recipe since the early 1970s (hence the retro post title) and it is always been a major hit.

All you need:

  • a standard size can of artichoke hearts
  • 1 cup of mayo
  • 1 cup of grated Parmesan cheese (or as my roommate calls it, "sprinkle cheese")
  • some crackers

First drain your artichoke hearts and then chop them up. How finely you chop them is totally up to you, personally I chop the heck out of those suckers. Next you mix the chopped artichoke, mayo and cheese together in a mixing bowl and then spread the mixture into a shallow baking dish (my mom uses a glass pie pan). Shove the dip under the broiler for 5 to 10 minutes, or until it starts to bubble and brown. Let the dip cool (seriously, I have majorly burned my lips from this dip in the past) and serve with crackers.

I sometime prepare the dip at home but wake to put it under the broiler until I reach the party, it travels well.

Tuesday, November 9, 2010

Holiday Feasting - My Go-To Fancy Appetizer

The holiday season is upon us. And along with those holidays come the holiday parties, dinners, and open houses. And along with those holiday parties, dinners, and open houses come the "oh, just bring an appetizer "requests(because, of course, you just had to offer to bring something). . . And for those times I have a few super easy appetizer recipes up my sleeve.

When the evening calls for an appetizer that is a bit more "fancy" you can't beat Brie en Croute (it even sounds fancy!). I know it sounds like it would be on the more complicated side, Brie en Croute could not be easy to make.

all you need -
8oz brie round
some sort of pastry dough (I use Pillsbury's Crescent seamless dough sheets)
some jelly or jam of your choosing (I use either my homemade pepper jelly or mango jam)
some fancy crackers
non stick cooking spray (or butter)

Preheat your oven to 350°F. Coat a cookie sheet with your non-stick spray (or butter). Roll out, spread out, or lay out your pastry dough and cut into two somewhat equal pieces large enough to fit your brie between (this is the en croute part if you hadn't already figured that out). Place your bottom piece of pasty dough on the cookie sheet, put your brie down in the middle of that, plop 3 or 4 table spoons of jelly/jam on top of you brie and spread it out a bit. Then fold up the extra dough from your bottom piece of pastry,then place your second piece of pastry dough on top of your brie and then sorta pinch and push and twist the top and bottom pastry pieces together officially making your brie "en croute". Pop that sucker in the oven for about 20 or 30 minutes or until your en croute looks nice a golden brown, cool for at least 15 minutes (though I tend make this right before I leave the house, so that it cools on the way to the function) and then serve with crackers.

bonus - if you have any extra pastry dough, roll it out and cut out some cute shapes, either with a cookie cutter or freehand, and then plop your cut outs on top to add a special touch.


Here is some different versions from Food Network if you want to fancy it up even more:

Dried Cherries, Pecans & Rosemary Brie en Croute
Holiday Brie en Croute
Paula Deen's Brie En Croute