Showing posts with label Crafty. Show all posts

Friday, June 5, 2015

DIY Donut Day Tote Bag


Today is National Donut Day, and in honor of this glorious day I decided a donut tote bag was in order.  And in true Laurendy Home fashion, this diy is super simple.

Supplies:
  • 1 sheet of ink-jet printable iron-on transfer paper
  • donut graphic download (get it here)
  • plain canvas tote bag 
  • iron


Now just follow directions for the iron-on transfer paper to print out the graphic on the transfer paper and then iron it onto the tote bag. . . Seriously, that's it.


Now rock that donut tote and go enjoy some actual donuts!

Tuesday, February 4, 2014

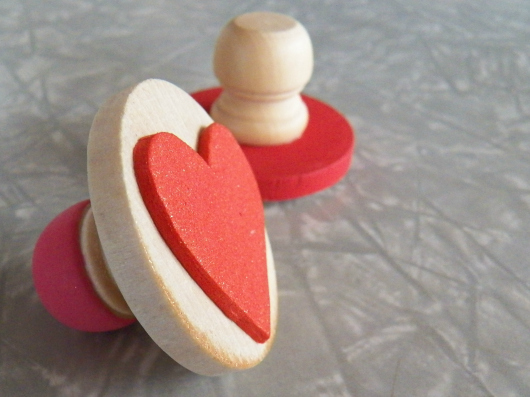
DIY Wooden Handled Heart Stamps

 
Valentine's Day isn't my favorite holiday, but I am a fan of the heart shape. . . So I whipped a craft that can either be for Valentine's Day or those who just like a good heart - a cute little wooden handled heart stamp -
 
 
What you need:
  • 2 inch wooden disks
  • wooden dowel ends
  • a sheet of craft foam
  • scissors
  • wood glue
  • white glue (or sticker maker)
  • red and/or pink paint
  • paint brush
  • stamp pad
  • blank note cards
(everything was picked up at my local craft store)

 
First step in making your heart stamps is painting what will be your handle.  You can paint the disk, you can paint dowel ends, you can paint them both, or you can choose not to paint any of it and you can totally skip this skip. Paint the disks on the top and around the sides, leave the bottom unpainted. Paint wooden dowel ends, I choose only to paint the tips and left the rest unpainted - I liked the look of the wood.  All the painted pieces needed two coats of paint for even coverage.


Once the paint has dried it is time to attach the two pieces of your handle - a little dap of wood glue will do you. While your glue is drying we can cut what will end being the stamp part of your stamp. This part is super easy, using your scissors just freehand cut hearts out of your craft foam. Just make sure your hearts are smaller than your wooden disks.

 
Next it is time to attach your stamp to it's handle, you can use your finger to add a smooth thin layer of white glue to the back of your craft foam heart (or you can run it through a sticker make) and then attach it to the bottom of the handle. . .

 
Now get to stamping! 

 
Note: don't skimp on super cheap ink, it does make a difference (see above)

Tuesday, August 6, 2013

DIY: Coin Statement Ring

 
I was wandering around the sewing section of my local craft store when I spotted some pretty tacky replica coin buttons, and I thought to myself "wow, those are some tacky buttons, but they would make awesome rings". . . and so, another super simple DIY was born.
 
Supplies (all can be picked up at your local craft store):
 tacky shank backed replica coin buttons, assorted ring blanks, E6000 glue, pliers

 
First you want to pair up your ring blanks with your buttons, I tried to match the finishes up as closely as possible.
 
Next you want to remove the buttons shank. I used a pair of pliers and just pinched it them off on the plastic ones, on the metal ones I used the pliers to wiggle the shank back and forth until it fell off.*

 
Once you have the shanks removed, go ahead and use a little E6000 and glue the ring blanks in place.
 
Then you just have to wait for them to dry (I suggest overnight).

 
BAM! Now you have yourself a pretty rad coin statement ring!


*You want to be careful and choose buttons with shanks that are simple to remove - one of the buttons I bought ended up with a super thick metal shank that I had to have a professorial remove with a grinder. . . which is way too much work for what is suppose to be a quick and simple craft.

Thursday, May 30, 2013

DIY: Honeycomb Cupcake

 
I have been inspired by all the cute honeycomb crafts that Studio DIY has been making, so I decided to give it a go and make myself a honeycomb cupcake. . . and you can too.

Thursday, December 15, 2011

I Made a Wreath (and you can, too)


As the post title states, I made a wreath (and you can too). I was totally inspired by this wreath made by Pickles, but hand felting all those balls and then sewing them together was just not in the cards for me. I wanted something easier, and a little more Muppet looking, if that makes any since.


You want to made yourself a wreath?


All you need -
- a wreath form of some sort
- a big bag of pom poms (I got mine for under $3 at Michael's with a coupon)
- a hot glue gun (with plenty of glue sticks)
and some time. . .

Simply hot glue the pom poms to the wreath form until you are happy with the coverage (be careful, I did burn my fingers with the glue gun a few times) and then hang that sucker on the wall -


Bam! You got yourself a wreath!